This is the second installment on applying information found in The Animator's Survival Kit by Richard Williams to creating a 3D (CG) character walk cycle. The first installment covered creating the first poses or extremes using a pose to pose method. That tutorial touched on the subject of process but mostly concentrated on how to craft visually appealing contact poses or extremes albeit with a not so pretty character. This installment will cover a little more on process while describing how to approach a second pass in the animation process in which I create the primary breakdowns for this walk cycle. Like Richard Williams' we will call these breakdowns the passing positions.
Pass 1 Complete: Timing Poses

Contact (or the timing) poses. Frames 1 -3 from left to right. I spaced these out to demonstrate a dynamic or progressive walk cycle can be made from this static, treadmill, "on-the-spot" walk cycle.
The first pass in this animation process establishes the extreme poses. Think of the extremes as primary timing poses. Once the walk cycle is complete, the number of frames between these poses will establish the tempo. The second pass will establish the primary spacing poses, or the positions that define how the character moves from one extreme to the next. As stated in part 1, if you alter the contact pose at either the beginning or end of the cycle, make sure to update its complimentary pose at the opposite end of the cycle. First and last poses have to be identical.

Part 1 involved only three frames in the time line, no less, no more. (click to enlarge)
One part of the process that I glossed over in the last tutorial involved having only 3 frames viewable in my time line. I was creating 3 extreme poses and so only needed three frames in the time line. Frame 1 = first contact pose (left foot forward), frame 2 = second contact pose (right foot forward), frame 3 = exact copy of first contact pose (left foot forward). This approach to the time line causes Maya to show you only the poses you have created and nothing more. I learned this approach from Keith Lango who has a wonderful, and very affordable, monthly video tutorial service. I subscribe to Keith's VTS and recommend it to anyone interested in accelerating their growth and understanding of animation. This method of only showing what poses (or drawings) you have created works just as well for mechanical exercises, such as walk cycles, and as well as for acting performances.
Beginning Pass 2: Spacing Poses

Spacing of a ball bounce into and out of the contact point. Richard Williams © 2001
The above image is a section of page 94 demonstrating how the path of a bouncing ball requires a series of drawings that define the arc of its movement and spacing into and out of its contact point. The first drawing to define this arc and spacing is called the breakdown. So, how does this information relate to a walk cycle? During pass 2 of this walk cycle we will create the middle 'drawing' between the contact poses that starts to define the arc and spacing of the movement.
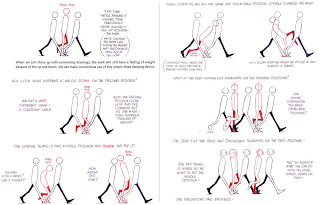
A variety of Passing Poses between identical and generic Contact Poses. Richard Williams © 2001
The breakdown, also called the passing pose for a walk cycle, provides an opportunity to add unique flavor or style in movement. Shown above are pages 112-113 from The Animator's Survival Kit. Richard Williams is demonstrating what opportunities the animator has while creating the primary breakdowns. Log that information away for future use, this tutorial will focus on a generic passing pose (as seen in the upper left page above) for this basic walk. But first, a little more about software.
Software Inbetweens
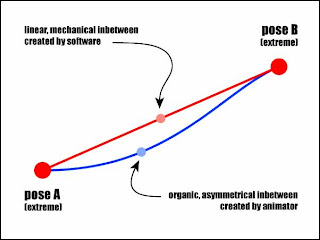
Largely symbolic this illustration shows how the computer can precisely split the difference between to extremes. Though undesirable as a final position this can be a useful starting point when creating breakdowns.
If you are new to animating in Maya, change away from Maya's default method for interpolating inbetweens: Clamped Tangents. Do it now! I tell students if I can't explain, at least to myself, the math that creates a curve from a Clamped Tangent then don't use it. I don't have an intuitive understanding of Clamped Tangents so I don't use them. In fact, I have yet to meet anyone who can explain Clamped Tangents without first reading Maya's help files. As animators we don't want anything between our intuition and what we create.
First lets take control of the Maya workspace. Other 3D packages have ways of doing what follows, but this tutorial is only covering how to approach this in Maya.
Animation and Timeline Preferences
Switching your environment settings on the fly is a valuable way to work while animating. Maya gives you a fast get to the preferences in the timeline.
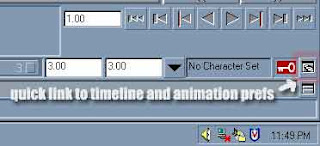
You can find a quick link to your Timeline preferences in the lower right corner of Maya.
Setting up your interface to match your work flow is a good habit to get into. The illustration above shows an easy way to get to your time line preferences while you are working in Maya.
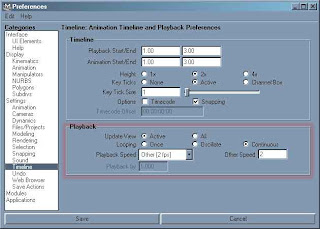
Maya allows you to override the default settings for playback speed in the timeline work space. (click to enlarge)
Here you see a custom setting of only 2 frames for playback speed. That setting allows you to see the timing of the contact poses... click, click, click, click... two clicks per second. Adjusting your playback speed to show you what poses you have created at the proper tempo can help when working in a pose to pose method. For pass 2 you can change the play back speed to 4 frames per second.
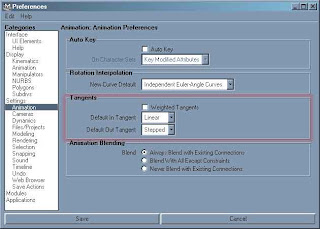
Creating keys with Stepped Tangents for default out tangent will avoid software inbetweening. (click to enlarge)
In the Maya preferences click on the subcategory of Animation to change how the software is set to interpolate (calculate) transitions between keyframes. Two types of tangent settings useful for early stages of animating in Maya: Linear Tangents and Stepped Tangents. This series of tutorials will explain the value of switching back and forth while using both. Changing the settings in the preferences only changes how new keys get created but keys made with prior settings have to be selected and changed manually.
Dope Sheet Editor
Here is when keying all attributes of you character becomes critical. First you can find the Dope Sheet Editor with the menu command Window > Animation Editors > Dope Sheet... . You will probably want to store a short cut icon to the Dope Sheet Editor on you Custom shelf with other often used commands... just use the menu command while holding down the Control and Shift keys simultaneously. If you have not locked your extremes in place by keying all attributes do it now before you attempt to change the timing of your work.
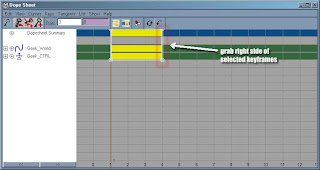
Inside the Dope Sheet, the short cuts for Move and Scale tools work same as view ports. (click to enlarge)
Select all animated attributes on your character. Open the Dope Sheet Editor. Select all keys found in the Dope Sheet Summery (blue horizontal stripe). Type the r key, short cut for Scale Tool, same as for manipulator in the view ports. You will change timing by scaling the keys over time in the Dope Sheet.
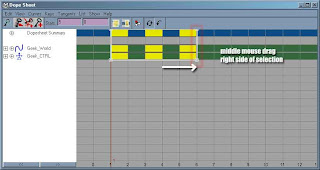
Scaling keys in the Dope Sheet is an easy way to add time between multiple poses. (click to enlarge)
With the Scale Tool active, use the Middle Mouse Button (MMB) to click and hold on the right side of the selected keyframes.... then drag to the right until the 3 keys are spread out over 5 frames. Keyframe data can have decimal values (floating point data) so use the Dope Sheet menu command: Edit > Snap. This command forces all selected keys to whole number frame values.
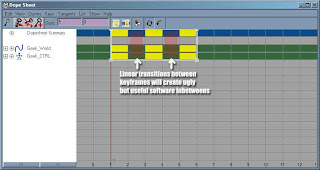
Newly re-timed contact poses present blank spaces for new inbetweens to be created. (click to enlarge)
The new spaces between keys will allow for software to inbetween your poses if you allow it to. The inbetweens will be mathematically precise but will have little value as animation poses until edited by the animator... that means you.
Graph Editor
First you can find the Graph Editor with the menu command Window > Animation Editors > Graph Editor... . You will probably want to store a short cut icon to the Graph Editor on you Custom shelf with other useful commands.
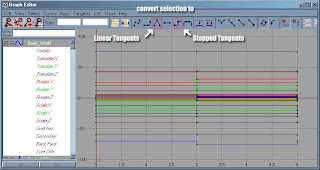
Graph Editor showing three contact poses with Stepped interpolation. (click to enlarge)
With all animated attributes for the character selected you can frame all keys in the Graph Editor with the f key.
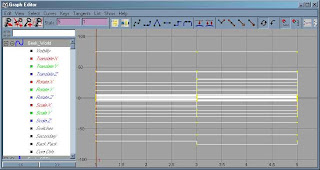
Dragging left the mouse button over the horizontal lines between keys will select all keys on the character. (click to enlarge)
Commands that changes in tangents will only effect selected keys. As with any graphics application, in Maya selection is critical to control and manipulation.
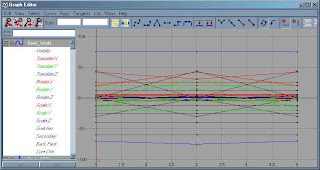
Clicking the button for Linear Tangents creates a linear interpolation between poses. (click to enlarge)
With all keys selected click on the Linear Tangents icon convert to linear tangents. You can also use the Graph Editor menu command: Tangents > Linear. Close editor, click play, watch the ugly inbetweens. Great math, terrible animation.
Using Maya's Inbetweens
So, what did all of that fussing with editors and preferences accomplish?
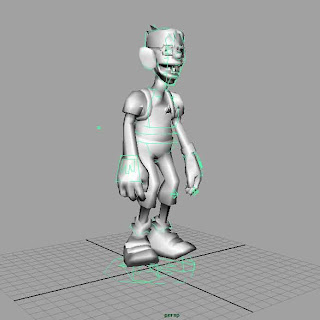
OMG! What a laugh! Character's feet floating in the air are a perfect illustration why computers can't be animators.
So what if Maya's inbetweens are ugly, they are still very useful. Maya is moving of a lot of details that you can then quickly adjust as needed. This approach will help create the proper (even) spacing along Translate-Z for a foot that remains on the ground. You will need to correct other elements so that they are not spaced in a boring, mechanical, and even manner.
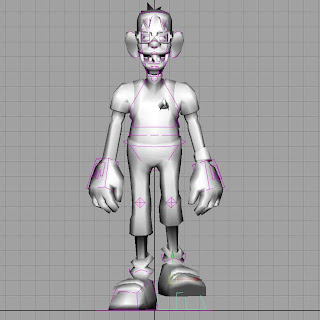
A modest improvement is easy to make as are a number of other changes to this first and most important inbetween.
Keep track of which foot is staying on the ground for each frame. The new passing poses will be created on frame 2 and frame 4. Start by removing custom values from the foot control for the foot that needs to remain on the ground for frame 2, and likewise for the opposite foot on frame 4.
Adjusting the Center
In general passing poses, or breakdowns, should not occupy the space exactly in the middle of two keys.
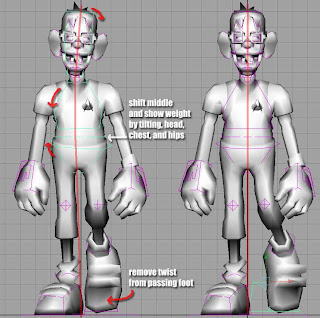
Adjusting the mechanical passing pose to look natural can be a quick process. (click to enlarge)
Adjust the root or center of the character so that the standing leg is straight. Shift weight towards the standing leg. Tilt hips so that passing side is low. Counter tilt in the hips by tilting shoulders in the opposite direction. Tilt the head as if it is dragging behind the body's weight shift. As stated in the last installment, strive top build overlapping action and drag into your poses.
Checking Arcs
Breakdown poses are a great way to establish arcs in your animation. The Breakdown is usually not in the exact middle between two extremes. The more it is off center the more pronounced the arc.
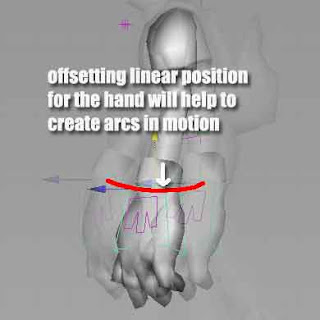
IK setups don't create arcs quite as easily as do FK setups. (click to enlarge)
This example uses the IK controls for the hand/arm so the arc in movement must be established by the animator. Simply pull the hand control object down slightly on the passing pose.
Favoring
Favoring is a great way to show weight and momentum in animation. When the breakdown is closer to one extreme it is said to favor that extreme. When creating the passing pose, or breakdowns in general, some elements should favor the prior pose more than others. This is will show weight for that element, as it is taking more effort to move the that part or change the its direction.

Create a position for the rear foot as it passes the standing leg that favors the prior pose. (click to enlarge)
The image above shows how the position of passing foot has been retarded behind the rest of the pose. A common mistake made by many inexperienced animators (especially CG animators) is to allow the passing foot to pop forward from the rear position. The rear foot must take time and effort to changing direction in order to show weight. Refer to my diagram above when I first introduced the subject of software inbetweens versus more organic (human created) inbetweens. This asymmetrical approach to creating poses and movement is central to creating more life like animation.
Standing Leg is Straight
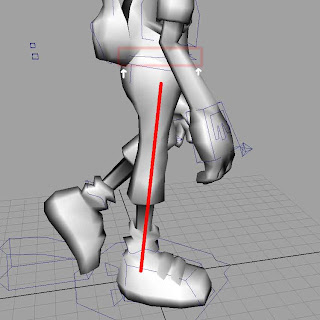
Straight standing leg also helps to maintain a sense of weight in the walk cycle.
Another important element is to create a straight knee for the standing leg. Lots of walk cycles (especially in CG) look soft and mushy because the standing leg is bent on the passing pose. Later stages in creating a walk cycle provide an opportunity to show how the knees will bend with the weight in the "recoil" and the "overshoot". These poses will be described in the next installment.
Creating Drag
Once again it is extremely useful to create shapes that will assist overlapping action in your sequence. The section above on favoring relates to the subject of creating overlapping action and drag. In general, the rule for creating drag is to have an extremely (such as head, hands, or toes) bend towards the prior position. Bend toes towards prior foot position on the ground. Bend the wrist so that hand and fingers point slightly towards the prior position. Tilt head towards middle position from prior Contact Pose.
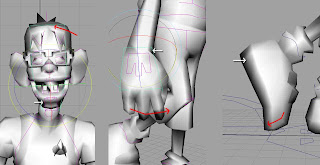
Subtle changes in position to drag will add a lot of appeal and weight to your walk cycle. (click to enlarge)
Flip and Roll
There are two ways that traditional animators checked their work while animating: flipping drawings and rolling drawings. Richard Williams describes this on page 81 of The Animator's Survival Kit. One method is for simple changes between a few drawings... rolling, and the other is for testing longer sequences. You have a few options in Maya to do the same kinds of testing.
To "roll" in Maya you need to use a simple key combination to step forward and backward in your sequece. While holding down the Alt key (Option key for Mac OS X users) use the > key (same as "." key no Shift key needed) to move to the next frame, and the < key (same as "," key no Shift key needed) the move to the previous frame. Get use to this method for moving forwards and back... and for the love of God (and your wrists) stop scrubbing.
To Flip through longer sequences you have a few options. Creatinga Playbast (a quick and dirty real-time render) is one option. Or just play back your sequence with the proper 'real-time' playback settings. For that you need the same number of frames in your time-line as poses in your sequence. For this second pass you should have five frames for five poses. With playback settings set to 4 fps click play and view your work from many different angles.... something you can't do so quickly with rendered Playbasts.
Incremental Saving
By saving your work incrementally you are providing yourself with lots of options. First, you are giving yourself a valuable archive of your progress. You are applying one of the most important principles of safety in file management: redundancy. Lastly, you are saving your progress in a manner that is very useful for working under a director. If a director needs you to change your performance you have earlier versions to go back to without having to start over from scratch.
Conclusion to Part 2
Below is an example of the poses created in the first two passes of animation. Unlike the prior animation example in part 1 this example below actually looks like a walk cycle.
Basic Walk Cycle: Part 2 from Erik Westlund on Vimeo.
It's amazing how easy to read this movement is with only contact poses (extremes) and passing poses (breakdowns). The next installment will cover how to create secondary breakdowns that will help to define overlapping action and weight and will spend time on movement of spine and arms.
part 3 is in the works. stay tuned.
-e
<- go to Part 1: Creating Extremes
6 comments:
A great 2nd part!
Thanx Again Erik...Do continue with this...
I remember having to do this. Great to see this again. Haven't done any animating in awhile but I might use this to do another walk cycle to get back into the animation part and talk a break from modeling. Keep the stuff coming, always can learn something bu redoing!
hey rd_sarns, its just a matter of time. As I type this part three is in the works.
Hey raven_mikhail, hows the big city treating you? If I remember you picked up the basics pretty quickly. A simple vanilla walk (which really isn't simple) is like doing your scales in music.
An attitude walk is always an excellent follow-up.
this is a relly good maya tutorial for animators keep up the good work
Thanks Arnel. I'm flattered to have your positive review. Looks like you have a lot of subjects covered yourself. Regards. -e
Great information!!! Thanks for your wonderful informative blog.
Village Talkies a top-quality professional corporate video production company in Bangalore and also best explainer video company in Bangalore & animation video makers in Bangalore, Chennai, India & Maryland, Baltimore, USA provides Corporate & Brand films, Promotional, Marketing videos & Training videos, Product demo videos, Employee videos, Product video explainers, eLearning videos, 2d Animation, 3d Animation, Motion Graphics, Whiteboard Explainer videos Client Testimonial Videos, Video Presentation and more for all start-ups, industries, and corporate companies. From scripting to corporate video production services, explainer & 3d, 2d animation video production , our solutions are customized to your budget, timeline, and to meet the company goals and objectives.
As a best video production company in Bangalore, we produce quality and creative videos to our clients.
Post a Comment